
WordPress Emails Going to Spam? Set Up a Free SMTP Relay with Brevo
The emails your WordPress site sends often land in the recipient's spam folder. The fix: Brevo's free SMTP relay.

As the owner of a WordPress site, you regularly receive automatic emails from your own site: a message from your contact form, a new comment to moderate, automatic plugin updates, and so on. Every plugin you install can send you its own notifications. But your visitors receive WordPress emails too — the confirmation that their message reached you, or, on a WooCommerce store, the many order notifications. All of these fall under what we call transactional emails. But how do you make sure none of these emails land in spam — not yours, and not your customers’ junk folders either? That’s exactly what we’ll uncover today: how to improve your WordPress email deliverability for free with Brevo (formerly Sendinblue) and the SMTP Mailer module of my free plugin Blaminhor Essentials, so you stop falling into spam.
Why do emails from your WordPress site so often land in spam?
For email providers like Gmail, Hotmail, Outlook, Yahoo and hundreds of others, fighting spam is a permanent and highly complex war. Gmail, for one, proved far more effective than its rivals right from launch. For an inbox to tell the relevant messages from the junk, it weighs a lot of criteria: the content, the sending email address and especially its domain name, but also its origin (which server or host sent the email, and was it even allowed to?). In short, to be treated as a legitimate email, you have to show your credentials and prove your good faith. On top of that, some providers such as Hotmail, Outlook and MSN are notoriously touchy — they’ll flag you as junk in no time and drop you straight into the spam folder.
What’s the problem with WordPress’s default email system?
When you write an email to someone by hand, the address you send it from usually belongs to your mail service (Gmail, Outlook, and so on). Gmail, for example, takes care of “signing” your emails when you send them, so that the inboxes receiving them know it really is you sending — and not someone impersonating you to send spam. But what about a WordPress site that needs to send emails? It has no “mailbox”; it isn’t an email-sending service. And WordPress isn’t going to log into your personal inbox to send them for you. So WordPress sends emails as best it can, but without them being properly “signed” the way dedicated email services do. By default, WordPress sends every email through an internal solution whose effectiveness depends entirely on your hosting — and, obviously, not all hosts are equal. In other words, relying on your WordPress default settings to send your transactional emails will never be the best solution, especially when your customers are supposed to receive them too.
The sending address doesn’t need to be able to receive emails — it only needs to be able to send them.
So let’s go with this setup: your emails’ sending address will be something like “[email protected]”, where “yourdomain.ext” is your main domain name.
Now, let’s talk about a solution to your spam problems: the SMTP relay.
Using an SMTP relay to prove your email isn’t spam (Brevo)
The principle of an SMTP relay is simple: it lets WordPress use an external service dedicated specifically to sending quality emails instead of going through your own server. Most newsletter services offer an SMTP relay, but they’re not all equal, in price or in quality. After testing several of them, the one that has never let me down is Brevo (formerly Sendinblue), which offers 300 free email sends per day (far more than enough, even for an e-commerce site) and delivers a near-perfect level of quality. I’d steer clear of Mailjet straight away — it stopped working on several of my sites without support ever giving me the slightest explanation. As for Mailchimp, which is pricier than most competitors, the SMTP relay isn’t even included in the plan. So let’s go with Brevo!
Setting up sending from your domain in Brevo (and editing your DNS)
As we discussed above, it’s important to send your emails from a domain name you own — your site’s domain being the obvious choice, since it’s yours. That way you can configure it exactly as required.
Step 1: set up your domain in Brevo (formerly Sendinblue) for your transactional emails
- Create a free account on Brevo if you don’t have one yet.
- Once logged into your Dashboard, click your name in the top right to open a dropdown, then click Senders, Domains & Dedicated IPs.
- Go to the Domains section, then click the Add a domain button.
- In the field that appears, enter your site’s domain, without http(s) or www.
You’ll land on 3 blocks all reading “The value does not match”. That’s normal — you now need to configure your domain’s DNS on the service where you bought your domain name (Cloudflare, Namecheap, GoDaddy, OVH, Gandi and so on) or your DNS manager (Cloudflare, for example).
All of these changes must be made in the DNS Zone of the domain you entered (and not in the DNS servers, which is something else entirely): you’ll add 3 TXT records there if they don’t already exist.
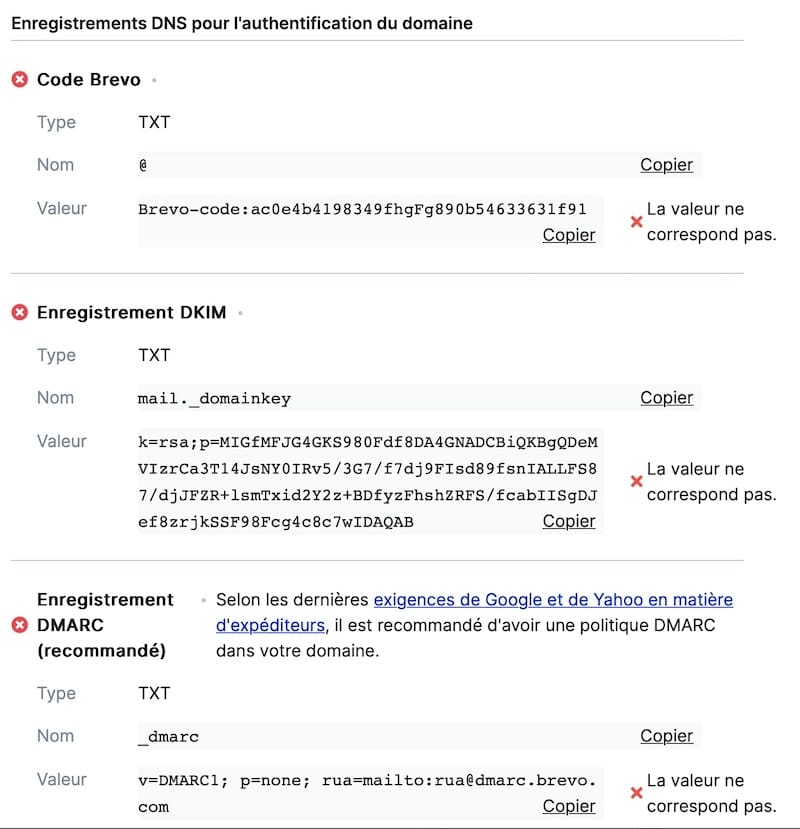
Example of the settings to add in the DNS zone as requested by Brevo
The exact steps to configure the DNS zone depend entirely on your registrar or host. For anyone who needs it, I’ve gathered the documentation from several hosts and registrars about editing the DNS zone so you’re guided through this step (depending on how good their documentation is…). If you run into trouble, don’t hesitate to post a message on the Wooordpress Forum. Once the DNS records are added to your domain’s DNS zone, go back to Brevo, to the same place as before, and click the Verify configuration button.  If everything went as planned, a little green icon will confirm it. If not, a few things could be going on:
- either you need to wait a few more hours for your DNS zone changes to be fully propagated (this can take anywhere from a few minutes to several hours),
- or a mistake slipped into your DNS records and they don’t exactly match what’s expected,
- or the DNS zone you’re editing isn’t the right one — in which case, don’t hesitate to ask your host’s or registrar’s support for help (or to leave a message on the forum, and we may be able to help you).
Step 2: Get your Brevo SMTP credentials
- From your Brevo account, click your name in the top right to open the dropdown, then click SMTP & API.
- Stay on the SMTP tab (the one active by default, next to API Keys): this is where Brevo displays everything an SMTP relay needs.
- Note your Login: it’s the identifier shown on this page, most often your Brevo login address. It will serve as your username.
- Click the “Generate a new SMTP key” button, give it a name (your site’s name, for example), and confirm.
- Your SMTP key appears in front of you. Click the little icon to its right to copy it to your clipboard. It acts as the password: you’ll paste it in the next step, into the SMTP Mailer module.
The hard part is done! Let’s move on to quickly configuring this SMTP gateway on WordPress.
Setting up the SMTP Mailer module of Blaminhor Essentials with Brevo
Back when I first wrote this tutorial, I set up my SMTP relays with the WP Mail SMTP plugin. Since then, I’ve built my own free plugin, Blaminhor Essentials, and it’s its SMTP Mailer module that I now use on all my sites. The job is exactly the same — you connect WordPress to the Brevo relay you just prepared — but with no technical settings to guess at, and with an extra safety net. Let’s see how.
Log into your WordPress admin, go to your plugins to install Blaminhor Essentials (free on WordPress.org), and activate it. In the plugin’s dashboard, enable the SMTP Mailer module, then open its settings. Under the Configuration tab, click Add relay.
Choose Brevo from the list of preconfigured providers. The module fills in all the technical settings on its own — server smtp-relay.brevo.com, port 587, TLS encryption — so there’s nothing to memorize or copy by hand. All that’s left is to enter your two Brevo credentials from the previous step:
- the Login (the identifier shown on Brevo’s SMTP page), as the username,
- and the SMTP key you just generated, as the password.
Finally, enter the sending address on your authenticated domain — the [email protected] we talked about earlier — and save. You’re done.
Well done! You’ve set up your Brevo SMTP relay so your WordPress transactional emails reach their destination! Shall we test it?
You can now test sending a transactional email straight from the module, in its Test email tab. Enter the email address where you want to receive the message, click Send a test email, and if it fails, the module shows you the server’s exact error; once the sending log is on, its Relay column tells you which relay handled the email — no more guessing. If you receive the email within a few seconds, that’s a great sign!
FAQ
Is Brevo's free plan (300 emails/day) really enough?
For a brochure site, a blog or a small shop, 300 emails a day cover your needs by a wide margin: contact forms, notifications, order confirmations. You only start to feel the limit if you send real marketing campaigns at volume. For everyday transactional email, the free plan holds up perfectly.
What's the difference between SPF, DKIM and DMARC?
SPF declares which servers are allowed to send email for your domain. DKIM adds a cryptographic signature that proves the message wasn't tampered with. DMARC tells inboxes what to do if SPF or DKIM fail. Together, these three DNS records show your good faith to email providers.
My emails still go to spam even after setting up SMTP — what should I do?
First, check that SPF and DKIM are validated on the Brevo side, with no typo in your DNS zone. Make sure the sending address really uses your authenticated domain. Take care of the content too: avoid overly salesy words and dodgy links. Finally, a brand-new domain builds its reputation over several days of regular sending.
Can I use something other than Brevo (Gmail SMTP, my host's SMTP)?
Yes. The SMTP Mailer module works with many relays and ships with ready-made presets: Brevo, Gmail, your host's SMTP, Mailgun, SendGrid, Amazon SES, Postmark and a dozen more. I recommend Brevo because it's free, generous and built for transactional email. A host's SMTP is often limited on deliverability, and Gmail quickly imposes quotas that don't suit a live production site.
Does this method also work for WooCommerce and contact forms?
Yes, completely. Once the SMTP Mailer module is set up with Brevo, every outgoing WordPress email goes through that relay, no exceptions: WooCommerce order confirmations, status notifications, replies from your contact forms. You configure it once, and your entire site enjoys far better deliverability.
Should I keep WP Mail SMTP or switch to the SMTP Mailer module in Blaminhor Essentials?
Both can connect WordPress to Brevo. I now use the SMTP Mailer module from my own free plugin, Blaminhor Essentials, because it adds what I was missing: backup relays that automatically take over if Brevo is down, a sending log so you can confirm each email actually went out, and failure alerts. And if you're coming from WP Mail SMTP, Post SMTP or Easy WP SMTP, it imports your existing configuration in one click — only the password to re-enter.
Comments